Hello my friends
First, Have you had your Flu injection this year ?
Well this week has been a complete wash out with the weather rain rain plus more rain, on the days we haven’t had rain I’ve not been able to get into the garden But I say no more. So I have decided to plant some more pots up with miniature iris and daffodils (Large Cupped Salome) also so some of the cutest smallest dwarf daffodils (February Gold) I have received my tulips this week from parkers with some
free patio tulips.
So I shall we see how they go and grow I’ve read some very horrifying stories about plants, bulbs plugs alike from this supplier but we will see. Ok tulips are best planted in December or so I’ve read.
Why?
Well it’s claimed that they require the cold to set the flowering part of the bulb and planting any sooner would aloud the bulb to wake up to early. Also a very important information some tulip’s will only flower for two or three year and then they will need replacing. So for this purpose I’m going to write the date on the underside of my pot so I can record this.
So I’m going to try and give you a step by step guide to how I planted my daffodils with images of each stage.
Here we go
First I found some bits of terracotta pots for covering the drainage holes, my sorry but I couldn’t find my camera in time to take a image, OK I forgot to take a photograph but take it from me there is terracotta in the bottom of my pots.
Second stage
I mixed John Inning’s number three with equal parts Arthur bower’s general purpose compost, any
compost will do, I only bought this as it was on offer. I then filled my pot to within 10 cm from the top.
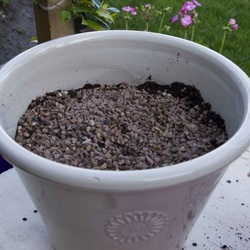
Third stage
I added some granulated fertilizer proceeded by a layer of grit, I’ve been told that bulbs don’t like to have their feet wet I also didn’t want the bulbs sitting on top of the fertilizer and burning/rotting. I then added a
little layer of the mixed compost to the pot just so the bulbs didn’t fall over.
First, Have you had your Flu injection this year ?
Well this week has been a complete wash out with the weather rain rain plus more rain, on the days we haven’t had rain I’ve not been able to get into the garden But I say no more. So I have decided to plant some more pots up with miniature iris and daffodils (Large Cupped Salome) also so some of the cutest smallest dwarf daffodils (February Gold) I have received my tulips this week from parkers with some
free patio tulips.
So I shall we see how they go and grow I’ve read some very horrifying stories about plants, bulbs plugs alike from this supplier but we will see. Ok tulips are best planted in December or so I’ve read.
Why?
Well it’s claimed that they require the cold to set the flowering part of the bulb and planting any sooner would aloud the bulb to wake up to early. Also a very important information some tulip’s will only flower for two or three year and then they will need replacing. So for this purpose I’m going to write the date on the underside of my pot so I can record this.
So I’m going to try and give you a step by step guide to how I planted my daffodils with images of each stage.
Here we go
First I found some bits of terracotta pots for covering the drainage holes, my sorry but I couldn’t find my camera in time to take a image, OK I forgot to take a photograph but take it from me there is terracotta in the bottom of my pots.
Second stage
I mixed John Inning’s number three with equal parts Arthur bower’s general purpose compost, any
compost will do, I only bought this as it was on offer. I then filled my pot to within 10 cm from the top.
Third stage
I added some granulated fertilizer proceeded by a layer of grit, I’ve been told that bulbs don’t like to have their feet wet I also didn’t want the bulbs sitting on top of the fertilizer and burning/rotting. I then added a
little layer of the mixed compost to the pot just so the bulbs didn’t fall over.
Forth Stage
I’ve been told It doesn’t really matter which way a daffodil is planted however I’m not going to go there with it for the beginner I’m going to plant my bulb the right way around, now you may be asking well which way is bottom and is there a top well to that question I will answer yes there is a bottom and a top so here
is an image of a iris bulb.
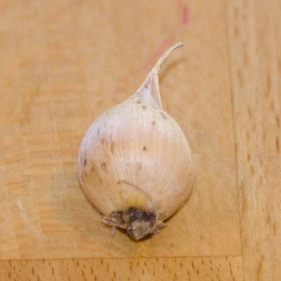
As you can see the bulb is pear shaped. You plant the bulb with the thickest part of the bulb in to the soil first with the thin tip pointing up so it can cut through the soil.
So after I placed my daffodils in my pot I covered them with my compost mix. Watered them in and when the soil level drops as I’m sure it will I will add some gravel to the top.
So after I placed my daffodils in my pot I covered them with my compost mix. Watered them in and when the soil level drops as I’m sure it will I will add some gravel to the top.
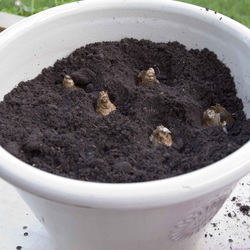
So after I placed my daffodils in my pot I covered them with my compost mix. Watered them in and when the soil level drops as I’m sure it will I will add some gravel to the top.
I hope you enjoyed my step by step guide to planting bulbs, I’m not saying this will work but this is all the information I have found on the internet and in my gardening books.
I’m always open the advice and comments good or bad and if I’ve done some think wrong or you have a different way of planting your bulbs please I would love to know.
Friday is a dry day form me so I’m going to poo pa scoop and work on my lawn as we have had some nice wet weather over the last week or two with more rain expected over the weekend it a great time to add Autumn granulated fertilizer to my lawn.
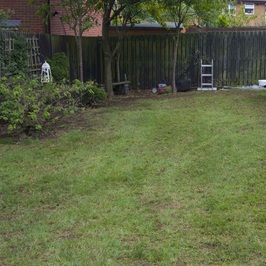
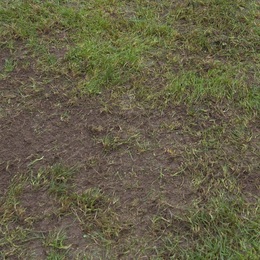
First I shall aerate the lawn and this is what my poor lawn looked like after aerating and raking I have it on good authority the lawn will love this drastic mess and come back next year stronger, healthier also thicker
than ever as all things in gardening it’s a waiting game so we shall see next year . I then add a light covering of top soil with added grass seeds I shall redress my lawn with this mixture and fill in pot holes , I will leave the fertilizer until the spring as with all the work that has gone into the lawn the grass will (in my view) stressed, but a good rule of thumb is you never feed a stress plant.
I should really take a photo of what the lawn looks like now as it look a complete mess but I'm for ever hopeful it's going to grow back better and stronger even greener but as all things in gardening you have to wait.
that's it for this week I hope you enjoyed my new blog
Anthony
I have my Flu injection this week lol
nice pics and clear info James well done
p.s I am sure the lawn will come back even better
I have my Flu injection this week lol
nice pics and clear info James well done
p.s I am sure the lawn will come back even better
 RSS Feed